 yonohomedesign.com Garden and Interior Design Ideas
As an Amazon Associate I earn from qualifying purchases.
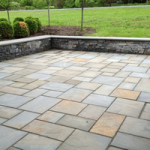
Installing patio slabs can be a great way to enhance the appearance and functionality of your outdoor space. Whether you’re looking to create a cozy seating area or a stylish dining spot, patio slabs can provide a durable and attractive surface that will stand the test of time. If you’re considering taking on this project yourself, here are some tips on how to install patio slabs like a pro.
1. Choose the Right Materials: Before you begin your project, it’s essential to select the right patio slabs for your space. Consider factors such as size, color, texture, and durability when choosing your materials. Natural stone, concrete, and porcelain are popular options for patio slabs, each offering its own set of benefits.
2. Plan the Layout: Careful planning is crucial to ensure that your patio slabs are installed correctly. Start by measuring your space and determining the layout of your patio. Use stakes and string to outline the area where the slabs will be placed, and make sure to take into account any slopes or drainage issues that may affect the installation.
3. Prepare the Site: Before you can begin laying down your patio slabs, you’ll need to prepare the site. This involves removing any existing debris or vegetation, excavating the area to the proper depth, and creating a stable base for the slabs. Depending on the type of materials you choose, you may need to add a layer of sand or gravel to ensure a level surface.
4. Lay the Slabs: Once your site is prepared, it’s time to start laying down your patio slabs. Begin by placing the first slab in a corner or at a fixed point, using a rubber mallet to gently tap it into place. Make sure each slab is level and spaced evenly from the others, using a rubber mallet or level to adjust as needed. Continue this process until all of the slabs are in place.
5. Secure the Slabs: To ensure that your patio slabs stay in place and withstand the elements, it’s important to secure them properly. Depending on the type of material you choose, you may need to use a special adhesive or mortar to bond the slabs together. You can also use edge restraints or borders to keep the slabs from shifting over time.
6. Finish the Edges: Once your patio slabs are in place, it’s time to finish the edges for a clean and polished look. Use a concrete saw or masonry chisel to cut any slabs that need to be trimmed to fit the space. You can also add a border or edging material to give your patio a more defined and finished appearance.
By following these steps, you can install patio slabs like a pro and create a beautiful and functional outdoor space that you can enjoy for years to come. With the right materials, careful planning, and attention to detail, your patio will be a welcoming and inviting space for entertaining, relaxing, and enjoying the great outdoors.


Amazon and the Amazon logo are trademarks of Amazon.com, Inc, or its affiliates.


